Simple Dock® Instructions
Patent No. US 10,017,230 B1
Accessibility: For text-only instructions, scroll towards bottom of page below images. If you need further assistance, please call 800-223-3444.

Accessibility - Text Only Instructions
THANK YOU for purchasing an American Muscle Docks Simple Dock®.
The Simple Dock® is designed to give our customers a simple, strong, and affordable floating dock system they can easily assemble themselves. Metal galvanized frames help alleviate the most difficult and time-consuming step for building your floating dock. Our standardized width and length dock sections, pin together hinge connectors, and anchoring hardware make it easy to configure a dock system in many different ways.
Important Notes:
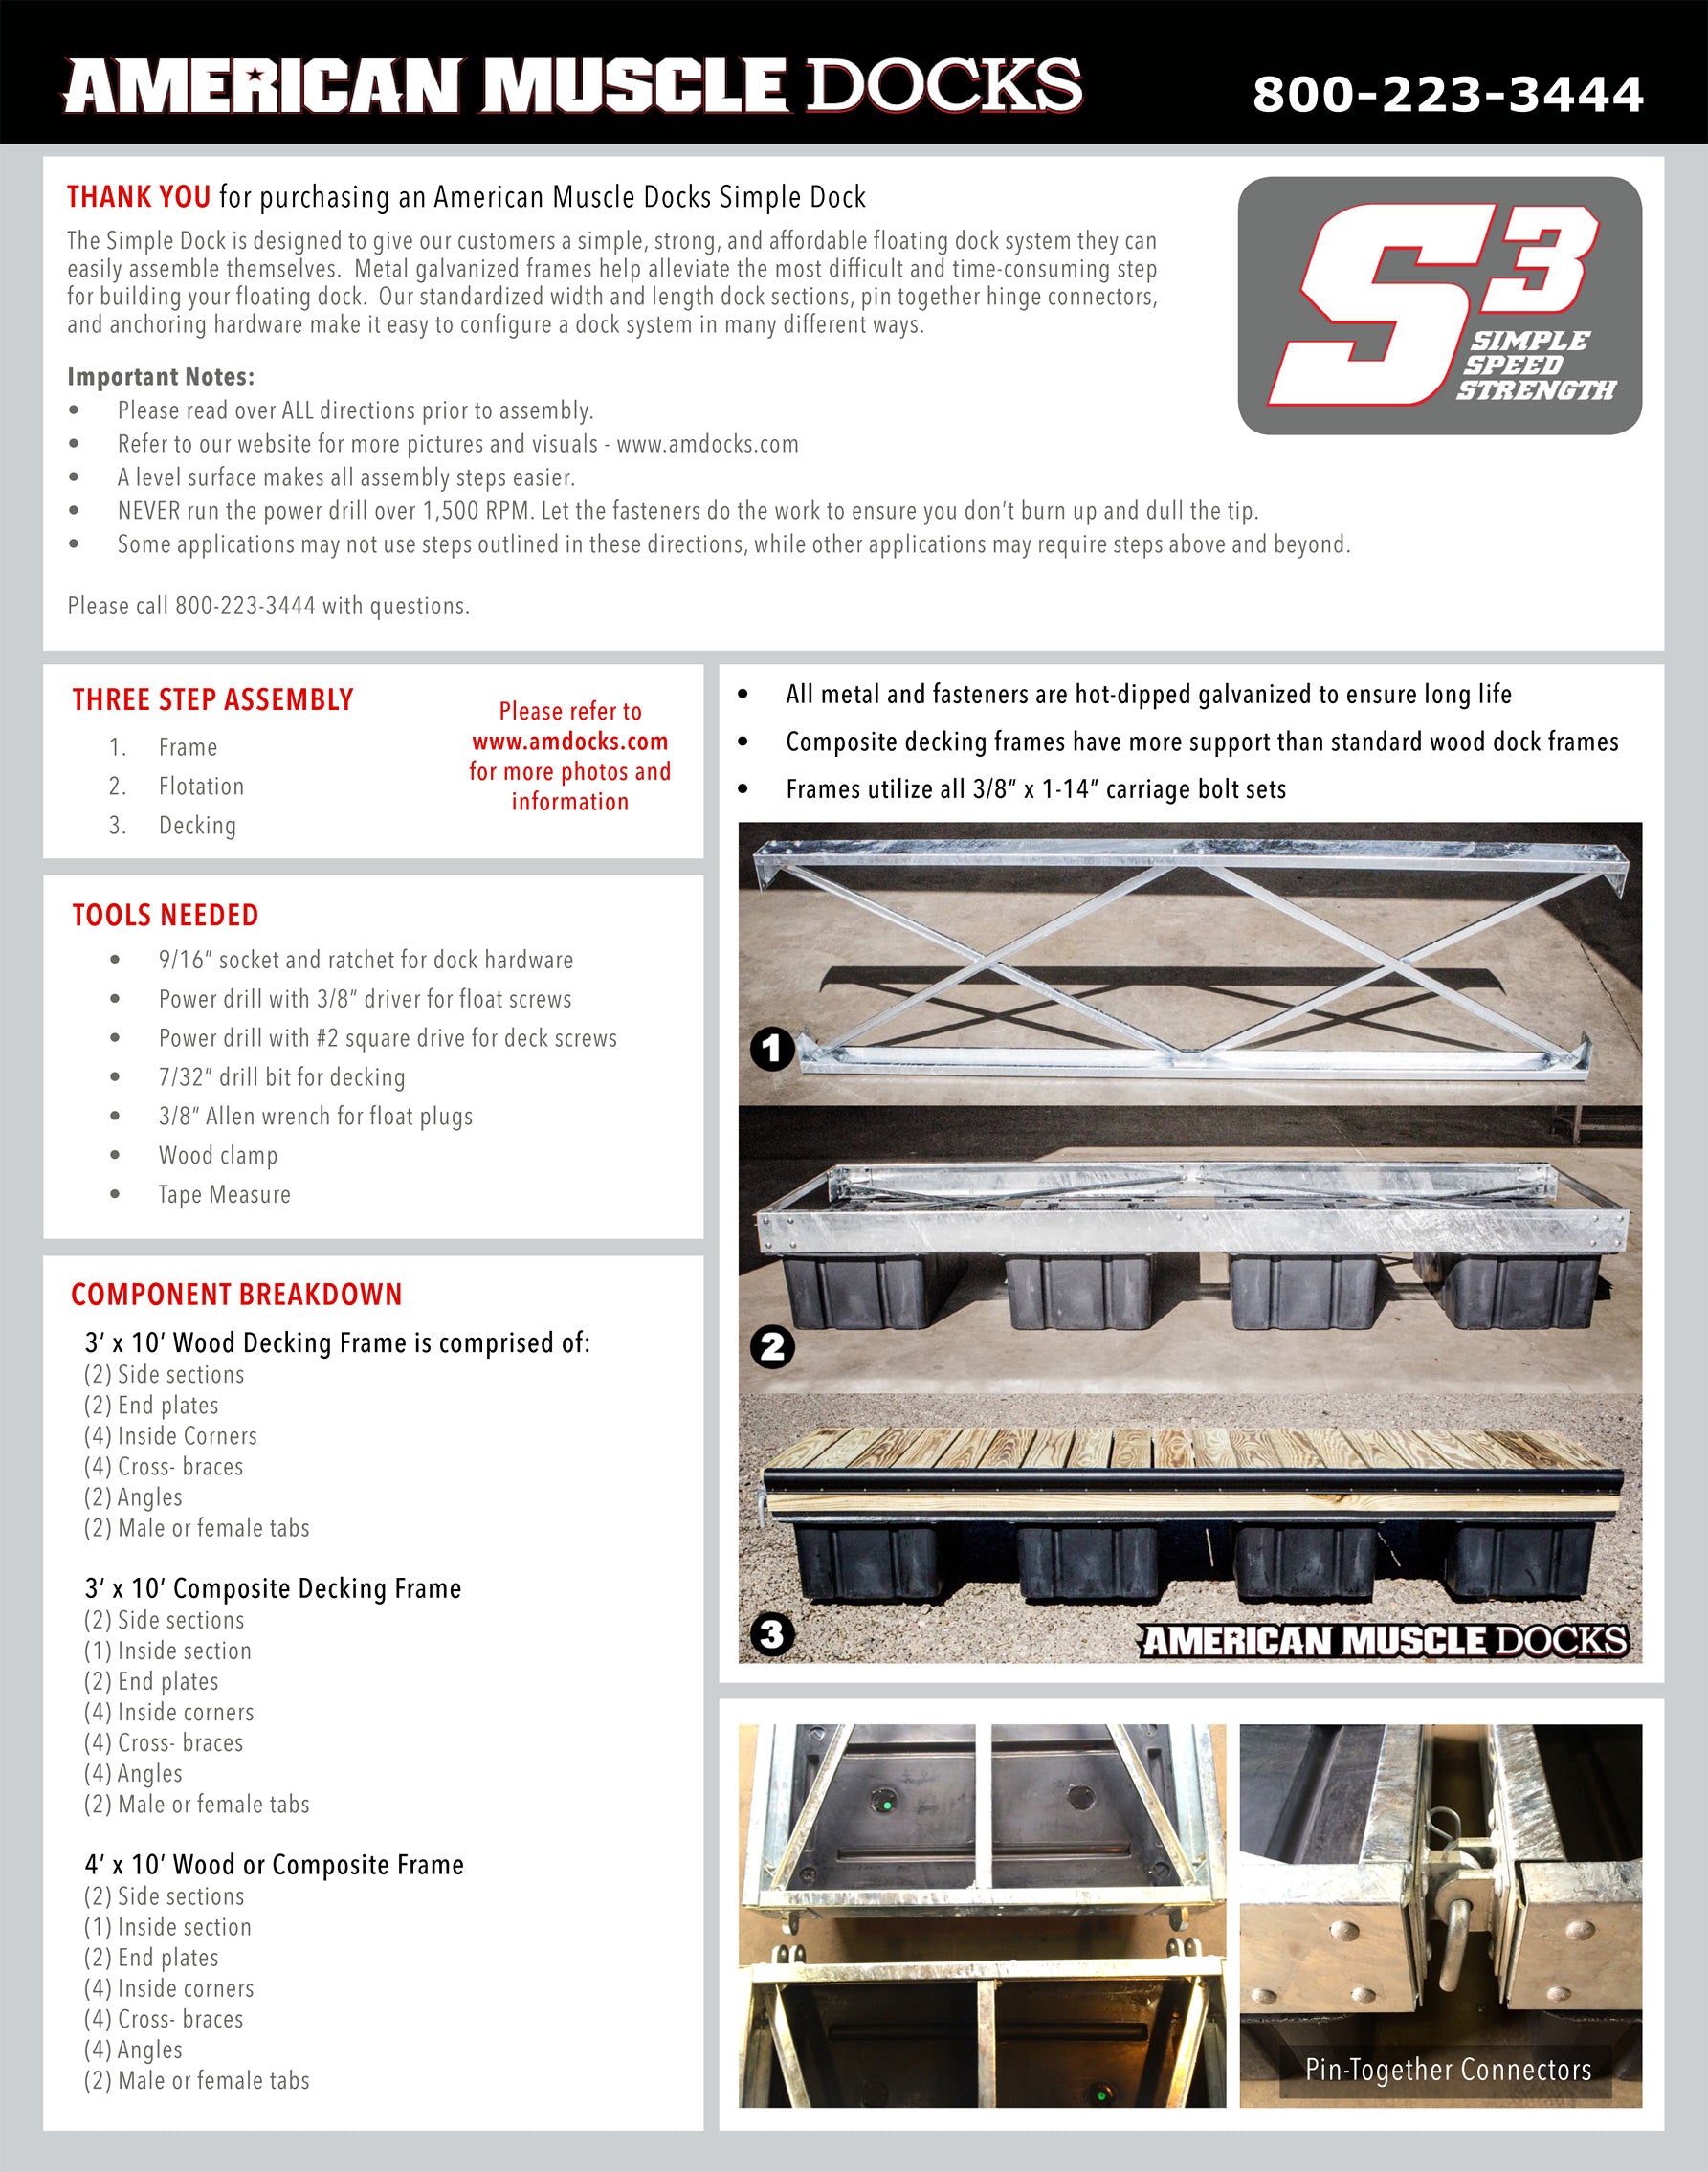
THREE STEP ASSEMBLY
TOOLS NEEDED
COMPONENT BREAKDOWN
3’ x 10’ Wood Decking Frame is comprised of:
3’ x 10’ Composite Decking Frame
4’ x 10’ Wood or Composite Frame
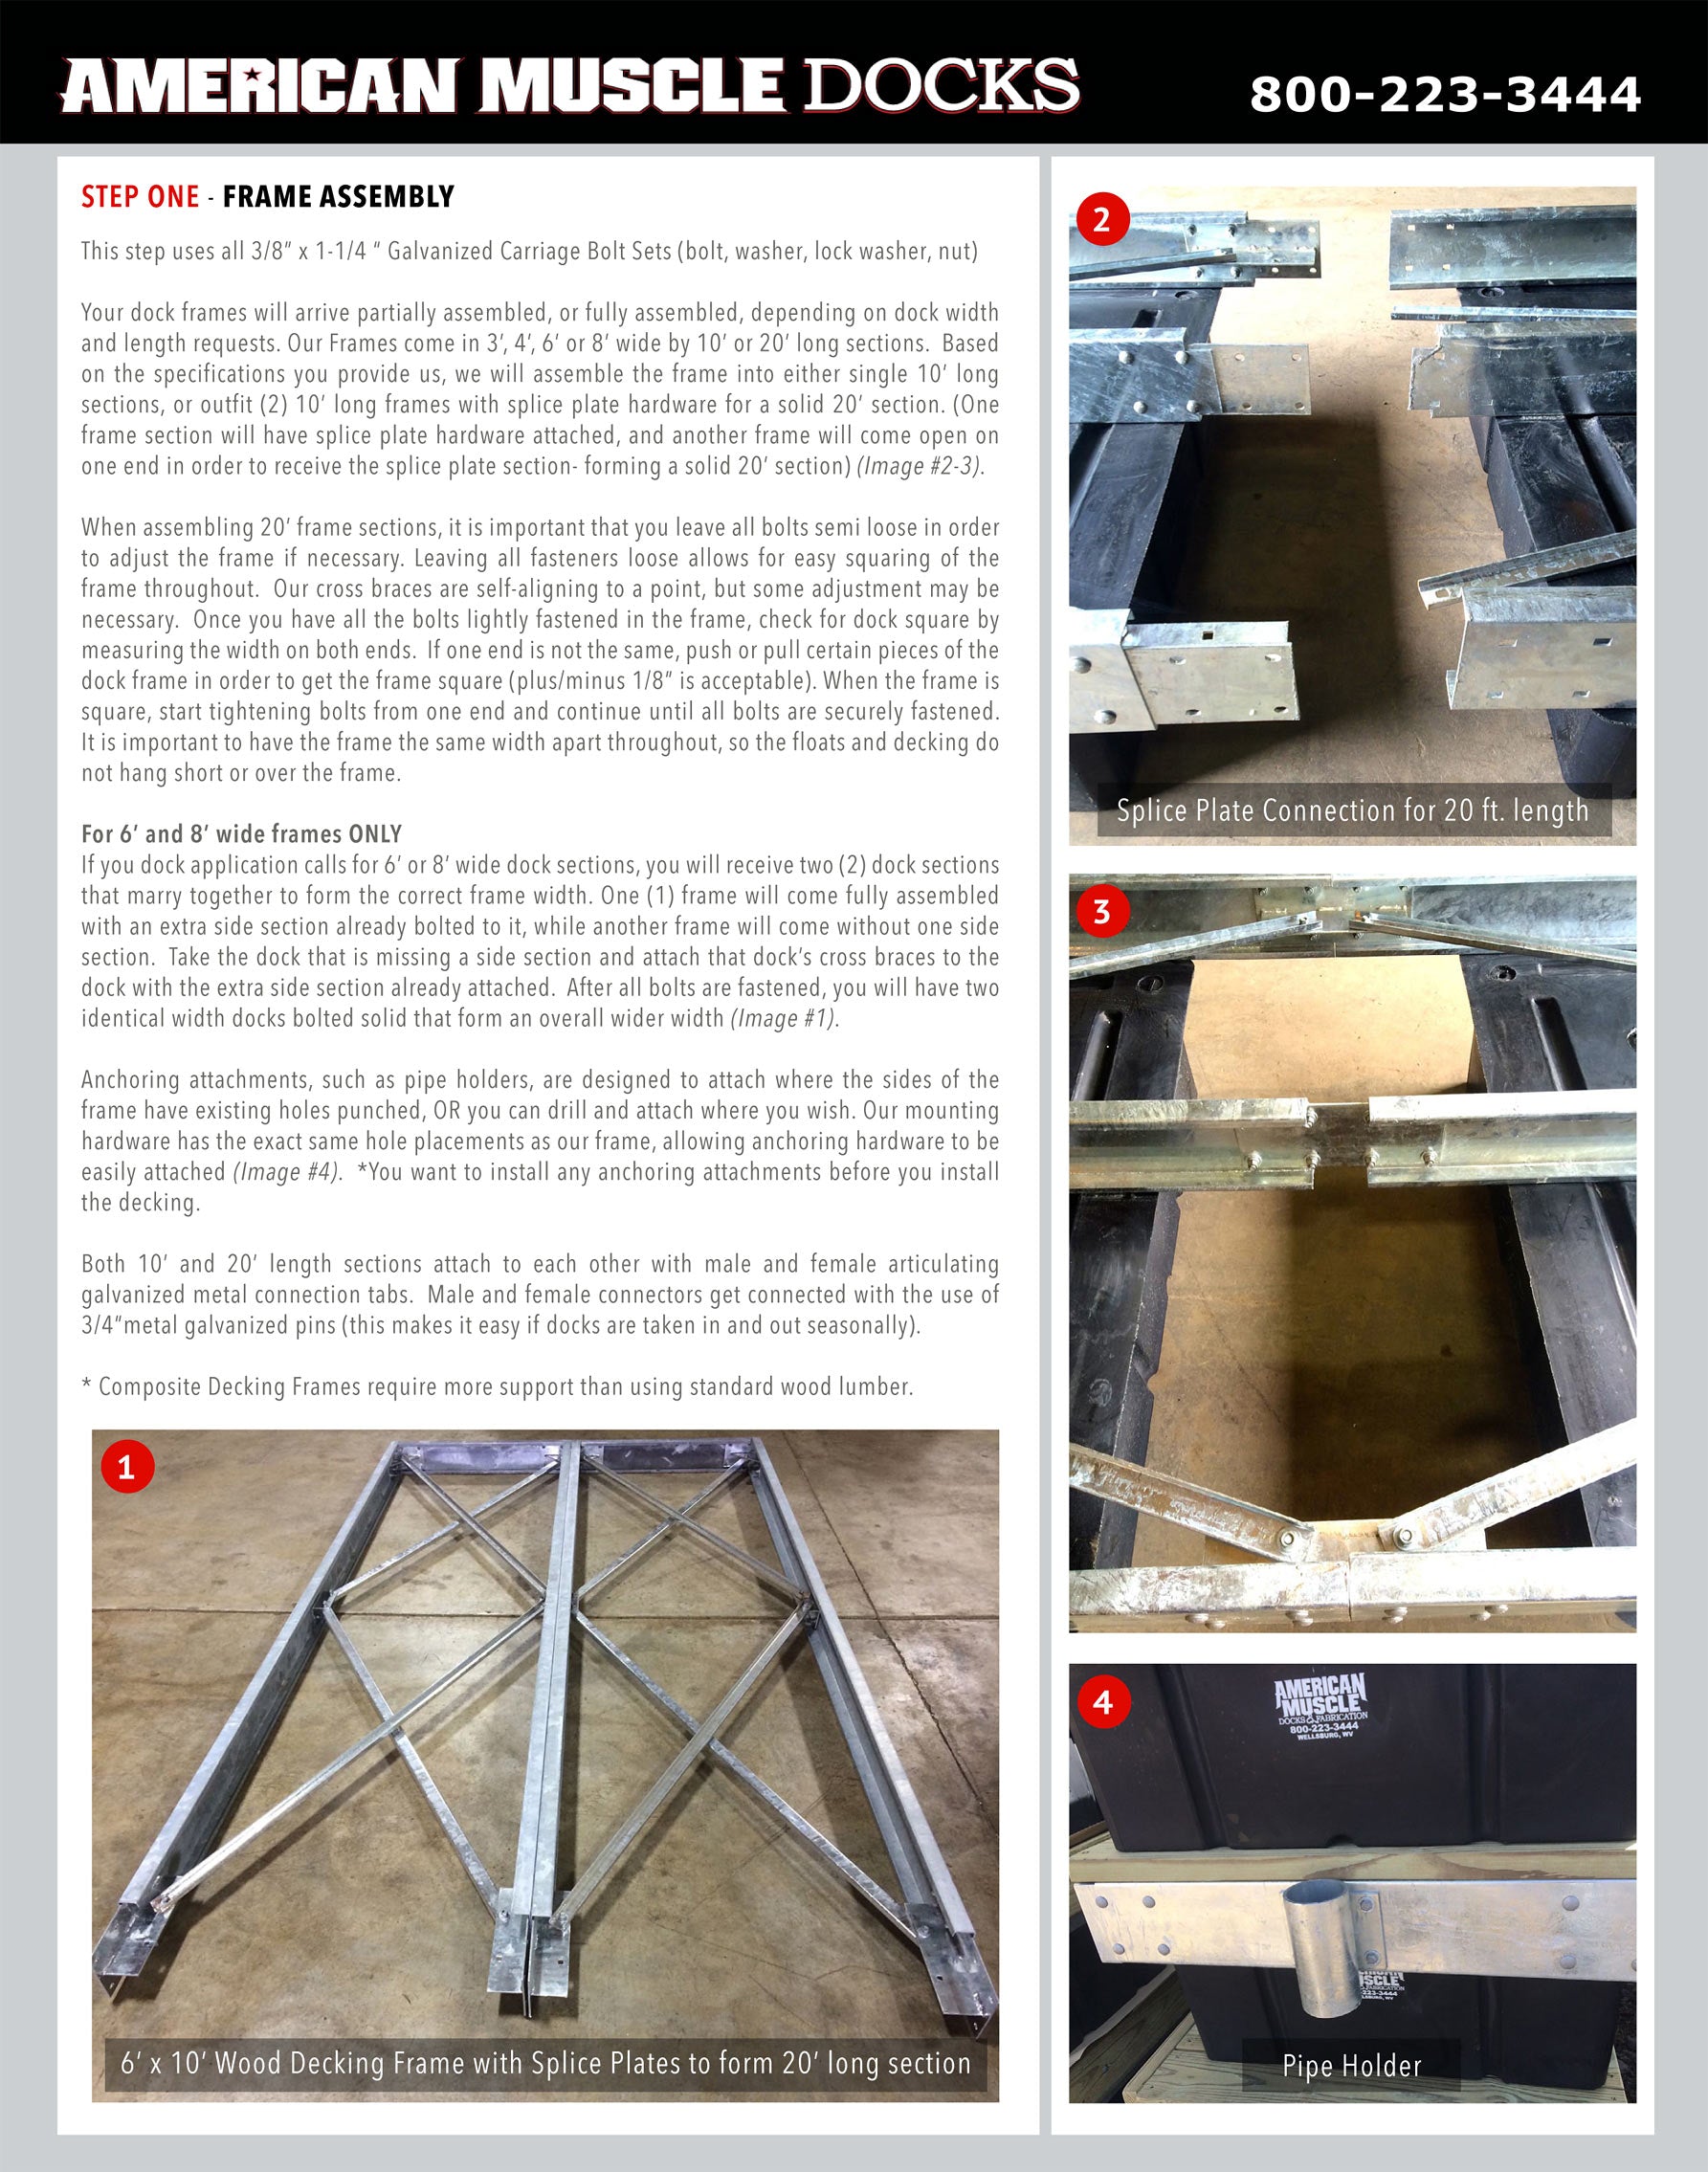
STEP ONE - FRAME ASSEMBLY
This step uses all 3/8” x 1-1/4 “ Galvanized Carriage Bolt Sets (bolt, washer, lock washer, nut)
Your dock frames will arrive partially assembled, or fully assembled, depending on dock width and length requests. Our Frames come in 3’, 4’, 6’ or 8’ wide by 10’ or 20’ long sections. Based on the specifications you provide us, we will assemble the frame into either single 10’ long sections, or outfit (2) 10’ long frames with splice plate hardware for a solid 20’ section. (One frame section will have splice plate hardware attached, and another frame will come open on one end in order to receive the splice plate section- forming a solid 20’ section) (Image #2-3).
When assembling 20’ frame sections, it is important that you leave all bolts semi loose in order to adjust the frame if necessary. Leaving all fasteners loose allows for easy squaring of the frame throughout. Our cross braces are self-aligning to a point, but some adjustment may be necessary. Once you have all the bolts lightly fastened in the frame, check for dock square by measuring the width on both ends. If one end is not the same, push or pull certain pieces of the dock frame in order to get the frame square (plus/minus 1/8” is acceptable). When the frame is square, start tightening bolts from one end and continue until all bolts are securely fastened. It is important to have the frame the same width apart throughout, so the floats and decking do not hang short or over the frame.
For 6’ and 8’ wide frames ONLY
If you dock application calls for 6’ or 8’ wide dock sections, you will receive two (2) dock sections that marry together to form the correct frame width. One (1) frame will come fully assembled with an extra side section already bolted to it, while another frame will come without one side section. Take the dock that is missing a side section and attach that dock’s cross braces to the dock with the extra side section already attached. After all bolts are fastened, you will have two identical width docks bolted solid that form an overall wider width (Image #1).
Anchoring attachments, such as pipe holders, are designed to attach where the sides of the frame have existing holes punched, OR you can drill and attach where you wish. Our mounting hardware has the exact same hole placements as our frame, allowing anchoring hardware to be easily attached (Image #4). *You want to install any anchoring attachments before you install the decking.
Both 10’ and 20’ length sections attach to each other with male and female articulating galvanized metal connection tabs. Male and female connectors get connected with the use of 3/4”metal galvanized pins (this makes it easy if docks are taken in and out seasonally).
* Composite Decking Frames require more support than using standard wood lumber.
STEP TWO - FLOTATION
*Remember to insert float plugs in each float before installation. 3/8” allen wrench needed.
Once the frame is complete and square, it will form a rigid frame to which flotation drums can be attached. **Note, when installing float drums, the frame must have the correct side up (the two punched holes in the middle of the outside frame sections should be closer to the ground). Most dock sections we ship will have “bottom” or “top” written on the frame (Image #5).
The floats for the dock sections are completely foam filled and have a 1 1/2” unobstructed - full perimeter mounting flange. The floats attach to the dock frame utilizing 1/4” x 1 1/2” Self-Drilling & Self -Tapping Fastener sets (fastener + fender washer).
Each 10’ long frame section will have (4) float drums attached. Float drums should be laid out and spaced evenly within the 10’ frame (make sure to put the outside floats as far to the ends as possible) (Image #7). The float and frame do not require pre-drilling, and each float attaches with (4) or (6) fasteners (wherever a float comes in contact with a metal frame). It is important to note that the float drums are generally as wide as the frame you are mounting them to. You can use the floats, as a guide to make sure your metal frame is square. It is important to align the float-mounting flange as flush as you can with the outside of the frame (a small overhang of the float is acceptable).
For 20’ length frame sections ONLY
20’ length frame sections receive (7) floats. The first float needing attached goes directly over the splice plate connection in the middle of the two 10’ frames. The float splitting the middle receives (10) fasteners (this helps to support to the joint) (Image #6). After the middle float is attached, lay the remaining (7) floats on the dock spacing them out evenly- starting from the ends working to the center (Image #8).
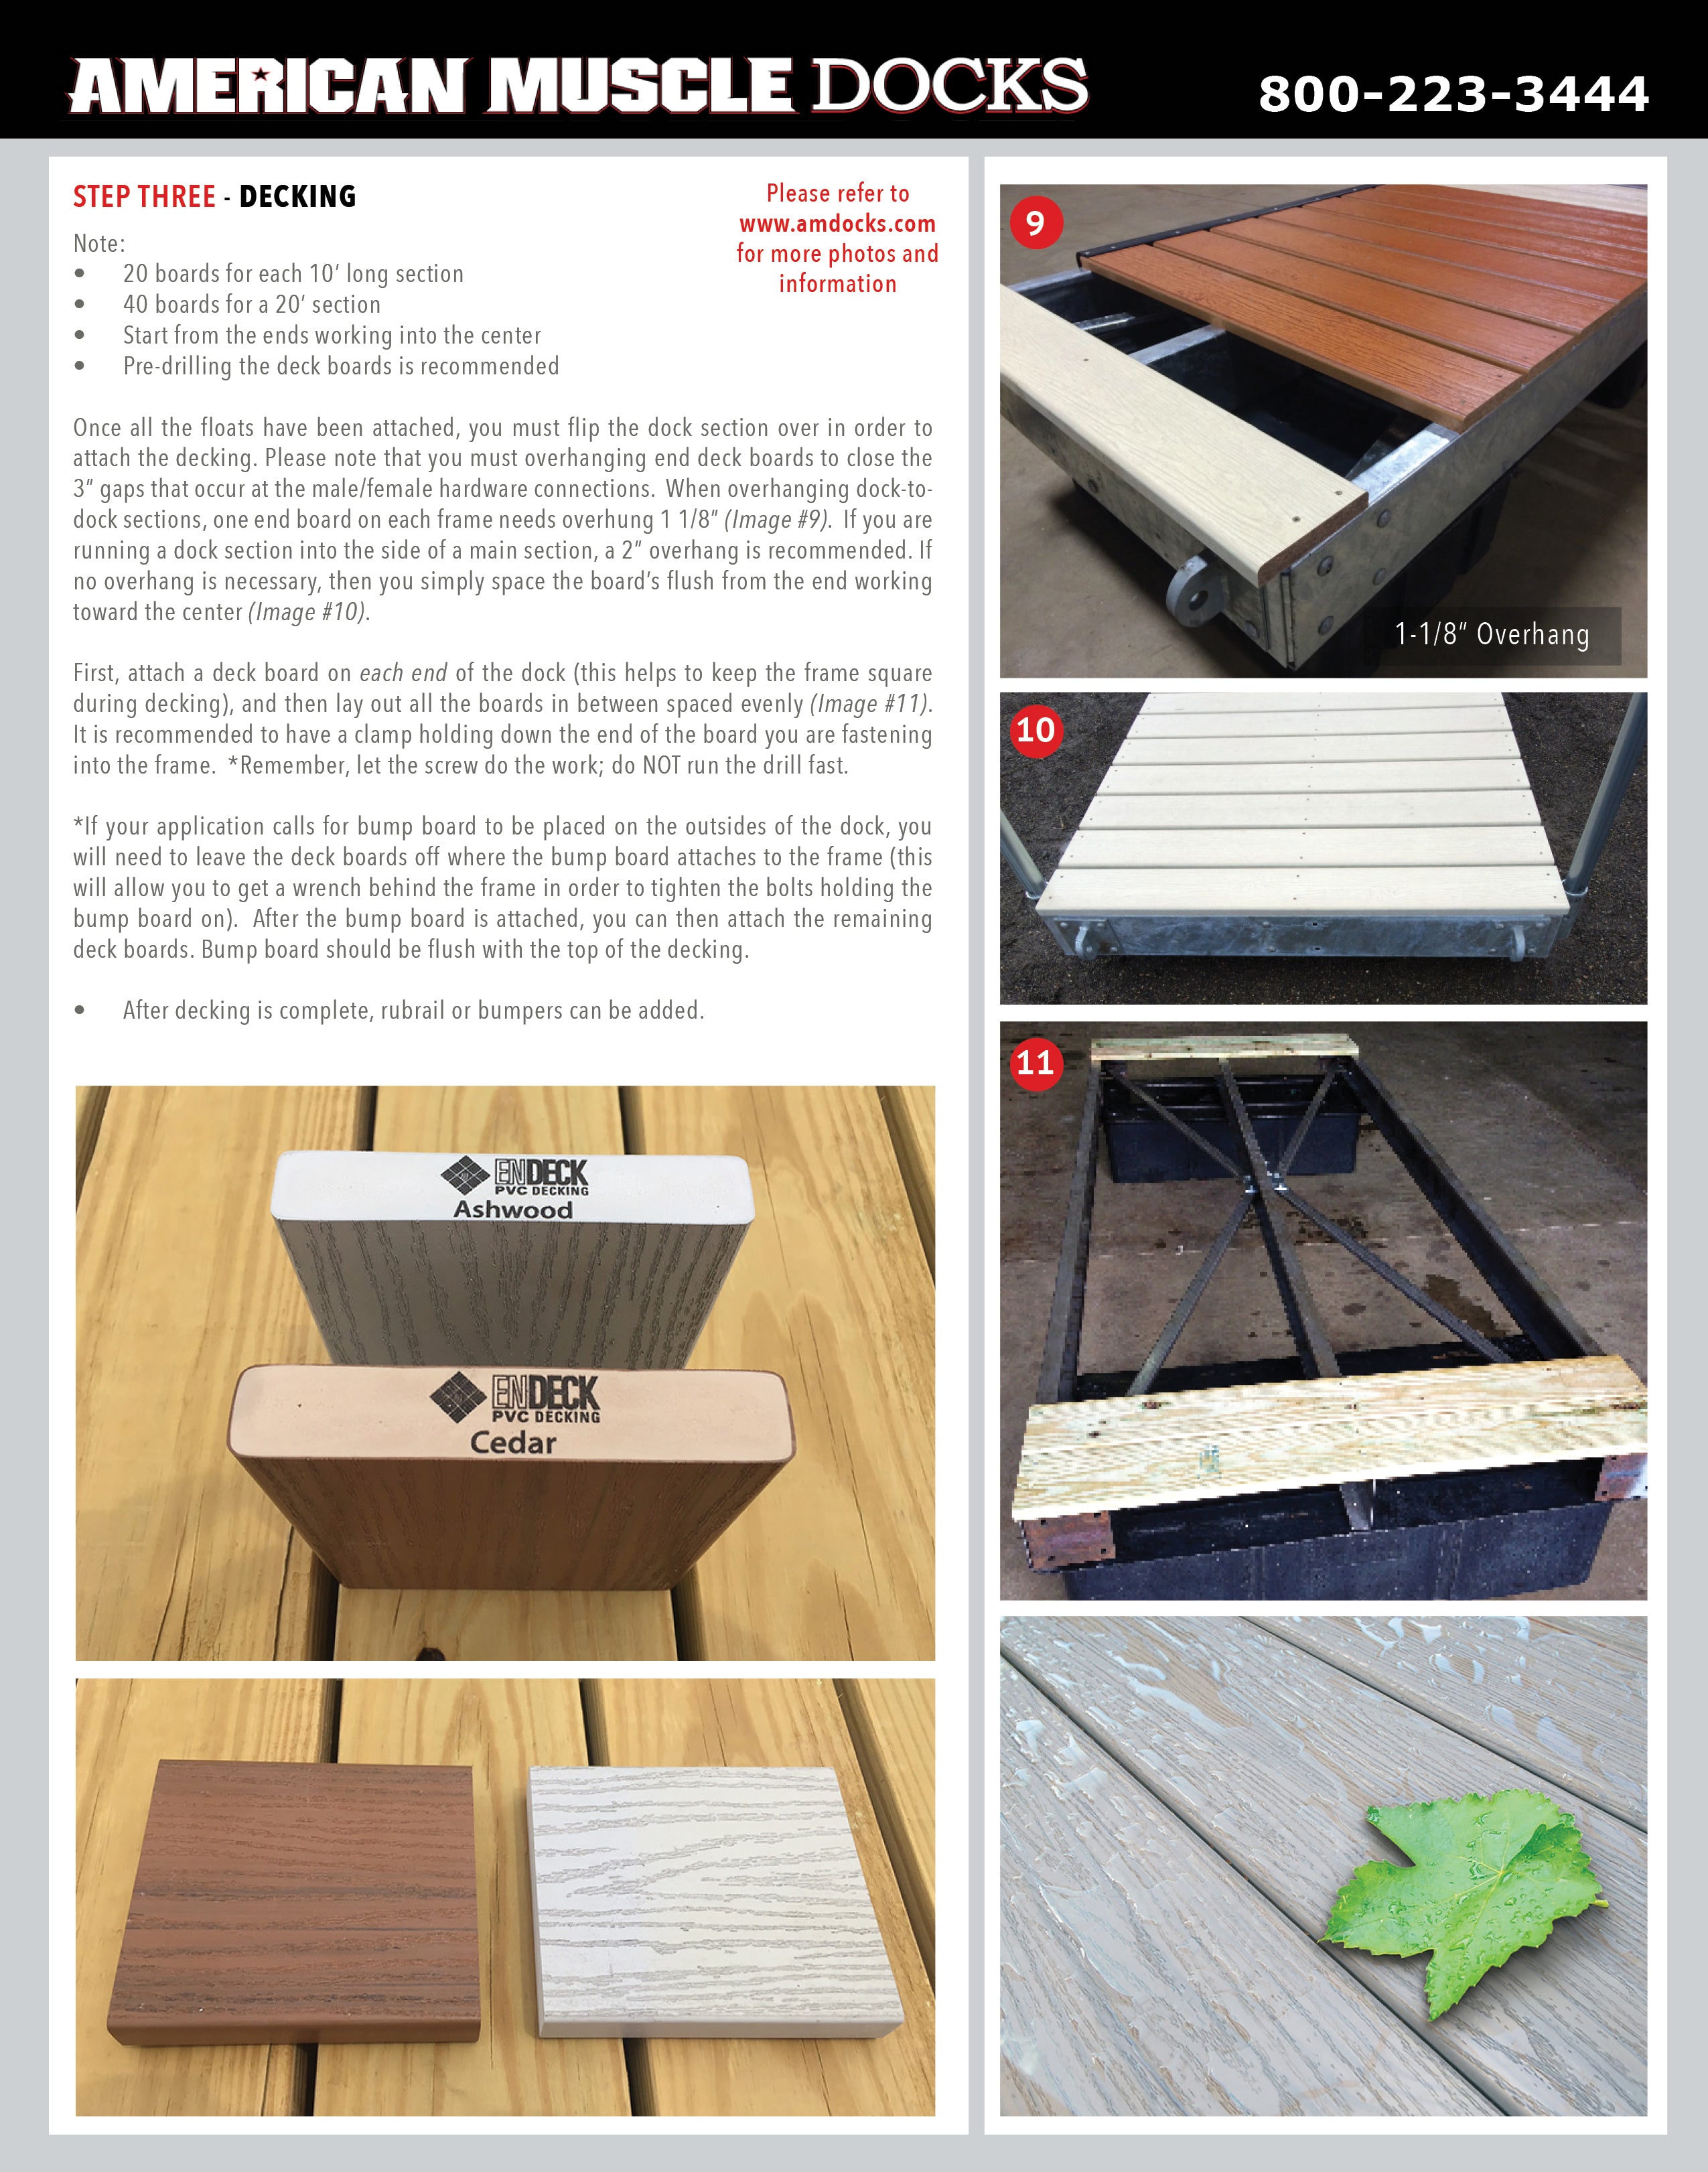
STEP THREE - DECKING
*Note:
Once all the floats have been attached, you must flip the dock section over in order to attach the decking. Please note that you must overhanging end deck boards to close the 3” gaps that occur at the male/female hardware connections. When overhanging dock-to-dock sections, one end board on each frame needs overhung 1 1/8” (Image #9). If you are running a dock section into the side of a main section, a 2” overhang is recommended. If no overhang is necessary, then you simply space the board’s flush from the end working toward the center (Image #10).
First, attach a deck board on each end of the dock (this helps to keep the frame square during decking), and then lay out all the boards in between spaced evenly (Image #11). It is recommended to have a clamp holding down the end of the board you are fastening into the frame. *Remember, let the screw do the work; do NOT run the drill fast.
*If your application calls for bump board to be placed on the outsides of the dock, you will need to leave the deck boards off where the bump board attaches to the frame (this will allow you to get a wrench behind the frame in order to tighten the bolts holding the bump board on). After the bump board is attached, you can then attach the remaining deck boards. Bump board should be flush with the top of the decking.
After decking is complete, rubrail or bumpers can be added.